Label Your Pull Requests!

I'm lucky enough to have been part of some amazing software teams. From developing core software inside PlayStation consoles (as part of Sony PlayStation's Advanced Technology Group), to building and running algorithmic trading systems in a multi-billion dollar hedge fund.
My goal is to help teams produce the best software possible, and enjoy themselves while they're doing it.
Does managing your team’s pull requests take time and effort? Productive teams are constantly opening new pull requests, and the more PRs your team has, the harder it is to keep track of them.
However, there are tricks that allow you to manage hundreds of pull requests relatively easily. One of those tricks is to use labels.
In this article, I’ll show you how to use GitHub pull request labels to greatly scale the number of PRs you can manage, and even get insights into your development process.
What Are Pull Request Labels?
Labels are text tags that you add to your pull requests on GitHub.
Why Use Labels?
Despite their simplicity, labels are a flexible and powerful tool for managing your team’s pull requests.
In addition, a tool like GitDailies can leverage labels to help you discover trends for different types of work. For example, how much time is being spent on bugfixes vs new features? or how quickly are security issues being resolved?
How to Add Pull Request Labels
Add Labels Manually on GitHub.com
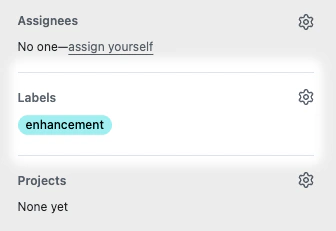
The easiest way to add a label to a pull request is using the GitHub user interface. Just navigate to the pull request, and on the right side of the “Conversation” page, you’ll find the “Labels” section:
Clicking on the gear icon brings up a list of labels you can add.
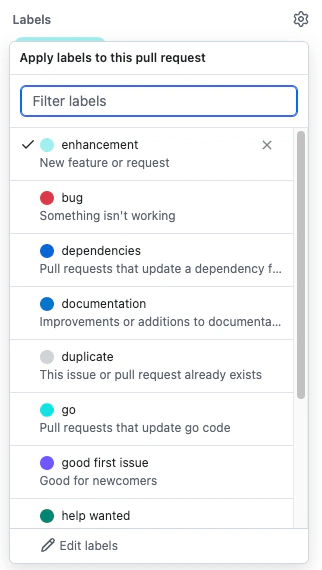
Each GitHub repository comes with nine default labels, including bug, enhancement,
documentation, duplicate, and so on. You can delete and edit these default labels, as well as
creating your own labels.
Add Labels Using the GitHub CLI
The GitHub CLI tool lets you edit various pull request properties, including labels.
This is very useful if you want to update the labels of several pull requests at once. For example,
if you want to label historical pull requests, you can create a script that calls
gh pr edit with the appropriate arguments.
The command has this form:
gh pr edit [<number> | <url> | <branch>] --add-label <name>
You can also remove labels from a PR using the --remove-label flag. All of the PR editing options
can be found in the GitHub CLI manual.
There is also the label command which allows you to
edit the available labels.
Add Labels Automatically Using GitHub Actions
A great approach is to automatically add labels using GitHub Actions. The official ’labeler’ action labels pull requests based on various criteria, including which repo file paths the PR affects, the name of the PR’s branch, or even whether the PR touches files of a specific type.
Here is an example from the labeler docs. (There are many more possibilities!)
# Add 'feature' label to any PR where the head
# branch name starts with `feature` or has a
# `feature` section in the name.
feature:
 - head-branch: ['^feature', 'feature']
Of course, you can mix any of these labeling methods, so you don’t have to exclusively use the web interface, GitHub CLI, or GitHub Actions.
Suggested Labelling Strategies
Categorization
An quick win is to add a label showing what kind of work the pull request represents. For example:
featurebugdocumentationdependencies
This lets you see at-a-glance what each PR is doing. It also helps you understand where your team is spending their time.
If your project enforces a naming format for branches (such as feature/my-new-feature or
bugfix/undo-terrible-mistake), it’s trivial to
automatically add categorization labels using a GitHub
Action that derives the label from the branch name.
Stage of Work
Some projects use labels to indicate what state a pull request is in. For example:
acceptedduplicateneeds-discussionneeds-investigationwaiting-on-upstreamwaiting-reply
These labels make it clear what the next step is to progress the pull request. This can be helpful when checking PRs that have become stale and working out what’s needed to get them ready for merging.
Prioritization
Some teams add an urgent label to PRs that need to be expedited. This helps you quickly find any
time-cricital PRs, and also communicates to reviewers that this PR should be prioritized over
others.
At the other extreme, a do-not-merge label indicates that a PR must not be merged into the main
branch. You might want to warn against merging because the PR only contains experimental changes, or
perhaps it’s a work-in-progress, or maybe there are specific requirements for testing or
documentation that need to be met before the PR can be merged. In all these scenarios, the
do-not-merge label makes it clear that the PR is not ready for production.
Get Metrics From Labels
Another benefit of GitHub pull request labels is they can give you insights into your development process.
For example GitDailies automatically parses your pull request’s labels and allows you to filter or group your engineering metrics by label.
This means that you can answer questions like:
For the whole organization, what proportion of monthly work is bugfixes vs features vs documentation?
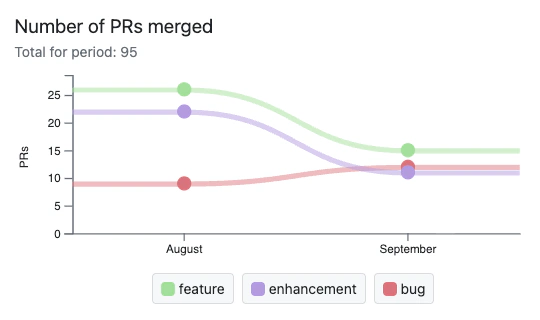
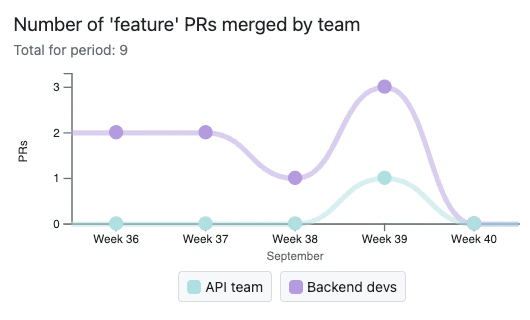
Over the last month, which team is merging the most new features each week?
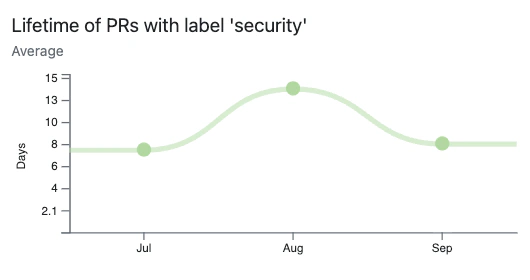
For each month in the last quarter what is the average time for security issues to be resolved?
If you would like to see these charts for your team, check out GitDailies!
Conclusion
Despite their power and flexibility, GitHub pull request labels are very easy to use and they greatly simplify the management of your team’s pull requests. Their flexibility also means you can use them in a way that suits your team’s way of working.
In addition, getting metrics from labels is an effective way to understand your team’s work, and whether effort is being spent in the right areas.
Get GitDailies
Empower your team to ship better software, faster.
- Use Pull Request metrics and DORA metrics to improve productivity and code quality.
- Get a daily summary of PRs, Reviews, and Commits.
- Get alerts and visualizations of stalled PRs, so work keeps moving.
- Build personalized alerts for events you care about.
- Installs seamlessly as a GitHub app.